DEPRECATED This page describes the legacy SSO configuration for Okta and Auth0. For new installations or migrations, see SSO OIDC (OpenID Connect).
Migration equivalences
Mapping table between legacy properties and the new OIDC configuration:
|
Legacy property |
New property / Action |
|---|---|
|
|
Remove - these are discovered automatically. Replace with |
|
|
|
|
|
|
|
|
Remove |
|
|
Remove - |
|
|
Remove - generated automatically as |
|
|
Remove - the default for |
|
|
Remove - the default for |
|
|
|
Integration model
Authentication
This functionality is directly embedded in the Zeus authentication management microservice, and is enabled and configured through that microservice's configuration file.
Authentication configuration
The property security.authentication.oidc.providers is used to configure the different authentication providers in use. For OKTA, the following properties must be completed:
security:
  authentication:
    oidc:
      providers:
        okta:
          # Provider name as it will appear on the login page
          name: OKTA
          # Provider URL to authorize Anjana Portal users (use variables in the URL)
          authorize-url: https://anjanadata.okta.com/oauth2/default/v1/authorize?client_id=${security.authentication.oidc.providers.okta.client-id}&response_type=code&response_mode=query&scope=${security.authentication.oidc.providers.okta.scopes}&redirect_uri=${security.authentication.oidc.providers.okta.redirect-uri}
          # Provider URL to authorize Portuno users (use variables in the URL)
          authorize-url-portuno: https://anjanadata.okta.com/oauth2/default/v1/authorize?client_id=${security.authentication.oidc.providers.okta.client-id}&response_type=code&response_mode=query&scope=${security.authentication.oidc.providers.okta.scopes}&redirect_uri=${security.authentication.oidc.providers.okta.redirect-uri-portuno}
          # Provider URL to manage token creation
          token-url: https://anjanadata.okta.com/oauth2/default/v1/token
          # Provider authentication scope
          scopes: openid profile email
          # Authentication client identifier in the provider
          client-id: xxxxxxxxxxx
          # Authentication client secret in the provider
          client-secret: xxxxx
          # Provider authentication method
          client-authentication-method: POST
          # URI the browser must redirect to after a successful login with the provider in the Anjana Portal
          redirect-uri: https://<host>:<port>/authorized
          # URI the browser must redirect to after a successful login with the provider in the administrative portal (Portuno)
          redirect-uri-portuno: https://<host>:<port>/configpanel/authorized
           # Field where the username is found in the provider
          username-claim: email
          # Provider type
          type: OKTA
Requirements
Application registration
This functionality is directly embedded in the Zeus authentication management microservice, and is enabled and configured through that microservice's configuration file.
The following shows how to create an Okta integration for Anjana Data. An integration represents the application within the Okta organization. The integration includes configuration information required by Anjana to access Okta.
To configure the integration manually once inside the Okta organization, you need to:
-
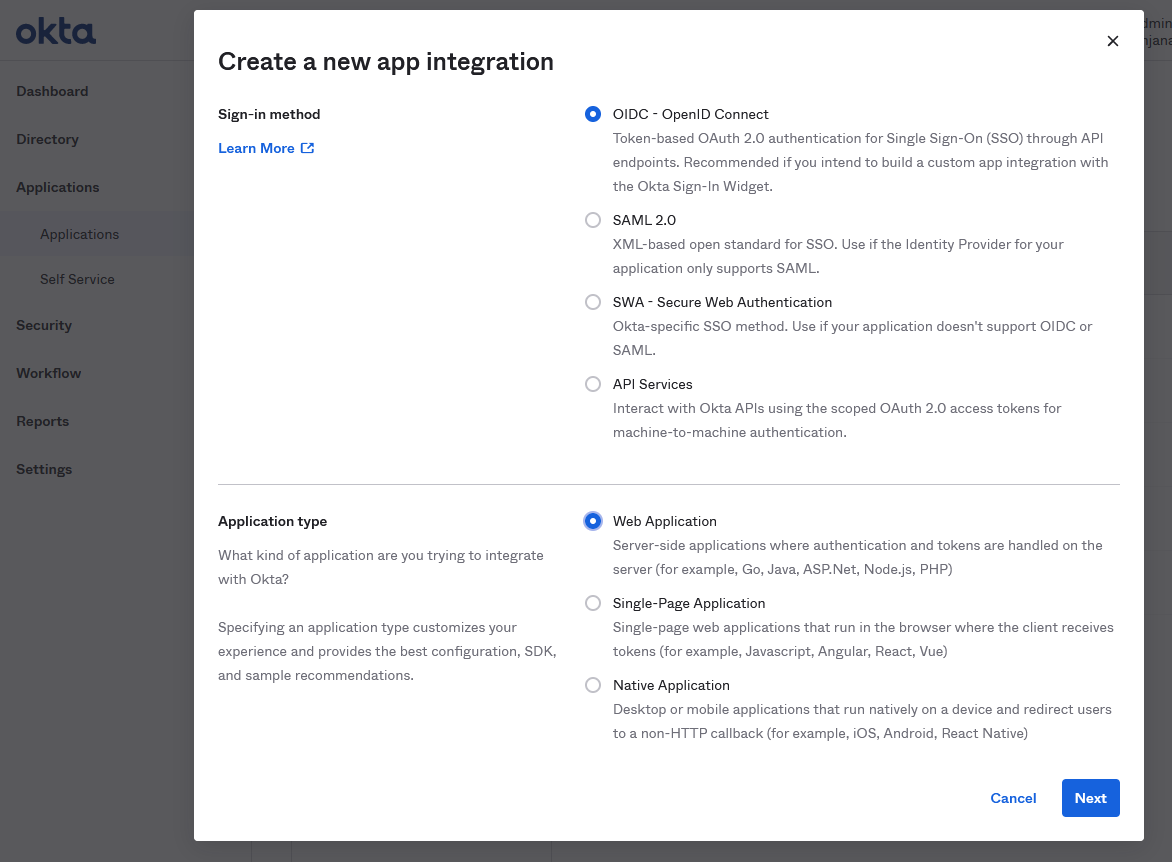
Click on Create App Integration.
-
Select an OIDC - OpenID Connect sign-in method.
-
Select a Web Application type (Note: choosing an incorrect application type can disrupt the sign-in or sign-out flows by requiring verification of a client-secret, which public clients do not have).
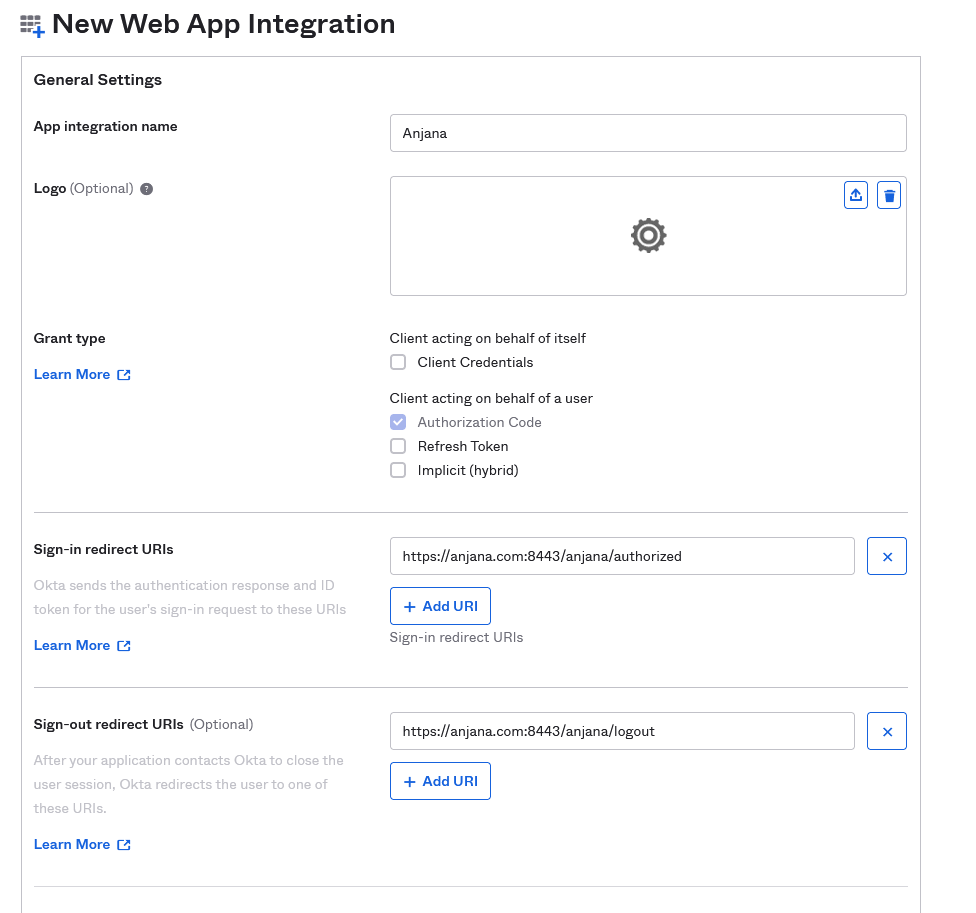
Enter an App integration name (Anjana).
(Note: The authorization code is selected by default and cannot be edited, as it is a mandatory type for Grant type).
-
Enter the value for Sign-in redirect URIs: https://<host>:<port>/authorized
-
Enter the value for Sign-out redirect URIs: https://<host>:<port>/logout