
Single node environment deployment
To deploy a single node Anjana environment, you must follow the steps described in the Anjana Deployment section. These steps can be summarized as follows, but you will still need to follow the section for more detail:
-
Create or have available a virtual machine according to the recommendations.
-
Request the necessary access and credentials.
-
Provision the environments according to what is documented.
-
Clone the appropriate inventory to create the inventory defined in the provisioning script:
-
localhost: when the ansible kit is located on the same machine where the product will be installed.
-
sample: when the ansible node is a different node from the Anjana node.
-
-
Make the required adjustments.
-
In the all.yml file of the chosen inventory, edit the desired version for the Anjana deployment according to the instructions.
-
Run ansible to deploy the product with or without sample data as needed.
AWS S3 as a replacement for MinIO
Buckets in AWS S3 will be managed in the same way as buckets in MinIO, with the option to customize the region and name of the buckets to connect to.
More details about connecting to AWS S3 can be found in the Cloud Integrations section, Buckets in AWS S3.
PostgreSQL RDS as a replacement for PostgreSQL
Connecting to an RDS will have practically no differences, since only the connection host and port need to be changed.
More details about connecting to RDS can be found in the Cloud Integrations section, PostgreSQL on RDS.
Balanced environment deployment
For the distributed and balanced Anjana deployment mode, the following machines are required:
-
2 VM Front + Back
-
1 VM Tot + Plugins
-
1 VM Solr + Zookeeper
-
4 VM MinIO (Cluster) or AWS S3
-
PostgreSQL RDS
-
1 VM ansible manager (optional)
IMPORTANT:
-
High availability is not provided by the product, but by the infrastructure. The product only offers load balancing.
-
Tot and the plugins do not need load balancing
-
PostgreSQL cannot be load-balanced in its self-hosted version due to its technical complexity. The use of PostgreSQL RDS is recommended if load balancing or high availability is needed.
-
Solr and Zookeeper do not require load balancing or high availability for their use case
Next, the steps described in the Anjana Deployment section will be followed, except for running Ansible to deploy Anjana, since it will be necessary to complete some prior steps.
Once the steps have been carried out, taking into account that:
-
The necessary credentials and access are already available.
-
The script has already been downloaded and the nodes that will make up the Anjana environment have already been provisioned (all the VMs mentioned above).
-
A customized inventory for the environment is already available.
-
The hosts.yml file has already been adjusted to include the IPs and other data of all the nodes in the environment.
-
The all.yml file has already been adjusted to determine the version or versions chosen for the deployment, as well as the ansible roles that will take part in the environment.
Next, the following sections are followed to adjust the persistences as needed.
It should be remembered that, according to the Cloud Integrations section, if it has been decided that PostgreSQL and MinIO will be replaced by RDS and AWS S3 respectively, the PostgreSQL and MinIO roles must be disabled to avoid their import and subsequent installation.
MinIO (Cluster)
For MinIO in cluster mode, the miniohosts.yml file in the inventory must be edited to adjust the volumes to the four available nodes.
The volumes option for Standalone mode will be commented out, and the volumes line for MinIO cluster will be uncommented and adjusted.
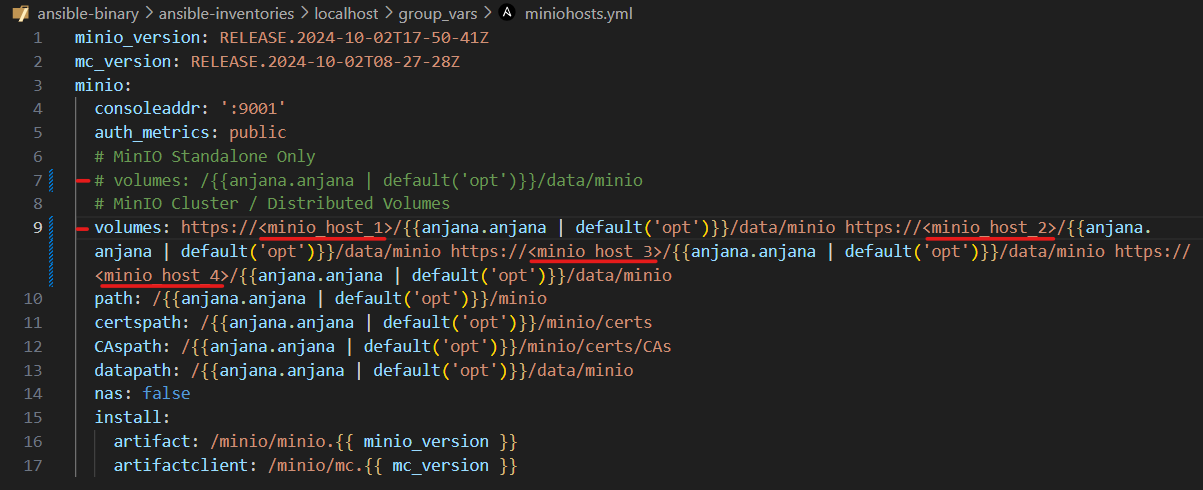
The data folder of a MinIO Cluster must be a mounted disk, or the following error will appear in the execution logs:

Next, the additional nodes for the MinIO balancer must be uncommented in the anjanauihosts.yml file and edited to correspond to the existing nodes:
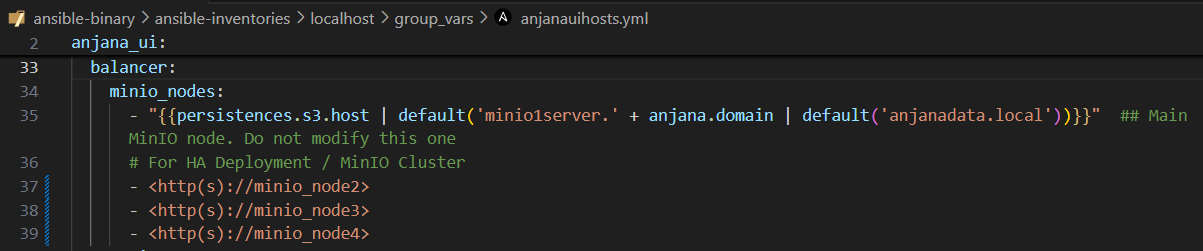
Recommended, to reduce the deployment complexity and cost of a MinIO cluster, to use its Cloud equivalent, in this case AWS S3, to have load balancing and high availability.
Now, once everything necessary to deploy the product has been adjusted, proceed with the installation using the ansible kit.
Recommended to run the Ansible ping command to check connectivity with the environment nodes before starting the installation:
sudo ansible -i /opt/ansible/ansible-inventories/<inventario>/hosts.yml all -m ping
To install Anjana with sample data:
anjana -t anjana-sample
To install Anjana without sample data:
anjana
Multiple plugin instances
To generate a second instance of an existing plugin, the following steps are required:
-
Duplicate the configuration template and the service descriptor of the chosen plugin in the inventory in use as many times as new instances you want to create, adding the appropriate numbering.
It should look as follows:
If both instances are going to use the same configuration, duplicating the configuration template is not necessary.
-
Add as many new entries for the selected plugin in the inventory's hosts.yml file as instances of that same plugin you want to add, changing the port, service name, configuration profile, and index (required for utilities such as start/stop).
The configuration profile name cannot be default for any of the plugin's instances; otherwise, all instances will retrieve that default configuration profile.
-
If the configuration of the second instance is different, the configuration profile will also need to be modified so that it is applied correctly.
Once everything has been adjusted, the configuration update will be run with the command:
anjana -t update-config
To deploy the new instance, the plugin's role must be run with the following command:
anjana -t tot-plugin-<plugin>
The following points must be taken into account for the ansible kit when dealing with multiple instances:
-
It is not possible to disable the role import in the all.yml file for a single instance; when the corresponding plugin tag is run, the role will be imported once for each instance until all of them have been provisioned.
-
It is not possible to select a single instance for configuration and plugin jar update operations; they will be carried out on all available instances.
-
It is not possible to select a single instance for plugin or environment start and stop operations; they will be carried out on all available instances.
Anjana environment + standalone plugins deployment
This use case covers the installation of a single-node Anjana environment, except for Tot+Plugins, which will be hosted on a separate machine.
To do this, the steps described in the Anjana Deployment section will be followed as if the deployment were a distributed environment, since it will indeed be so for the Tot+Plugins part, taking into account the additional adjustments detailed below:
-
All the plugins to be deployed will be enabled in the all.yml file's import_role section, according to what is mentioned in the Role and configuration import section.
-
The anjana.plugins_config.standalone property will be edited in the all.yml file to set it to true, according to what is mentioned in the installation configuration section.
Once these changes have been made, it will be possible to continue with the installation steps.
The following points must be taken into account when working with plugins in standalone format:
-
It will not be possible to disable horus even if the plugins do not need it, since the rest of the microservices depend on it.
-
The configuration directory is the one specified in all.yml according to the installation configuration section. Modifying it will affect both the standalone plugins and the Anjana microservices.
-
The configuration of the standalone plugins is stored in the same configuration directory as the rest of the microservices, but on the machine where each plugin is located.
-
If the configuration directory is located outside the machine(s) where the plugins are, it will not be reachable by them unless it is mounted external storage.
Cloning a PRE environment to PRO
For this use case, a pre-existing PRE environment will be taken as the starting point, whose data is to be migrated to another PRO environment.
It is possible to clone the persistences and the configuration using the clone functionality or tag.
Preparation for cloning
It is taken as a starting point that the following requirements have been met:
-
installation.mode has been set to manager in the all.yml file.
-
Credentials and access to the Anjana repositories are available and correctly configured.
-
All connection strings belonging to the persistences are correctly configured. For more information, see the Connection Strings section.
In case of doubts regarding the all.yml file, you can consult the All.yml explained section.
Data + configuration cloning
All the persistence data and the configuration of the Anjana microservices and plugins will be backed up using the following command:
anjana -t clone
all the resulting files will be stored on the manager machine, in the /opt/export-import directory by default. A compressed archive will be generated so it can be easily transported.
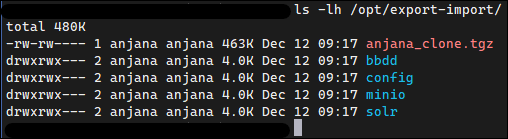
To transfer the data to the destination machine, run the following commands:
scp -i /<user>/.ssh/<key>.pem <user>@<origen>:/opt/export-import/anjana_clone.tgz /<ruta_local>
scp -i /<user>/.ssh/<key>.pem /<ruta_local> <user>@<destino>:/tmp/anjana_clone.tgz
sudo mv /tmp/anjana_clone.tgz /opt/export-import/anjana_clone.tgz
The /opt/export-import directory must exist on the destination machine.
Data restoration
To perform the data restoration, after being on the destination machine (PRO), there are two possible cases:
CASE 1 - Restoration in a new environment
If the restoration is carried out in a newly created environment or machine, it will be necessary to deploy Anjana and all the persistences, without data, in order to later fill them with the cloned data.
To do this, after being on the destination machine, you would need to download and adjust the ansible kit to deploy Anjana, using the command without tags:
anjana
CASE 2 - Restoration in an existing environment
If the restoration takes place in an environment with Anjana already deployed, the following points must be checked:
The destination environment where the restoration will be performed must have the same Anjana version as the source environment of the data. If there are discrepancies, the versions must be adjusted in the all.yml file and then updated with the command:
anjana -t update
The restoration process does not overwrite or delete data, so it is necessary to first delete the data and the configuration, by running the following command:
anjana -t delete,delete-config
Once the tasks and requirements corresponding to the case the environment is in have been completed, in order to proceed with the data restoration, the .tgz archive generated in the cloning process must be located at the path defined in the variables file mentioned above, by default /opt/export-import/anjana_clone.tgz.
The following points must be taken into account:
-
The S3 buckets must be created beforehand and match the names specified in all.yml if they have been modified.
-
The data cloning and restoration process does not transfer changes made on the web server. If modifications or customizations have been made to the apache2 configurations, they will need to be transferred or copied manually.
For general restoration, the following command will be run:
anjana -t deploy
For individual restoration of persistences and/or configuration:
anjana -t deploy-s3
anjana -t deploy-bbdd
anjana -t deploy-config
After the data restoration, it is recommended to restart the environment with:
anjana -t restart
Loading an accelerator sample after deployment
Once the solution has been deployed, Anjana Data Platform allows you to load a sample of data from the accelerators offered by Anjana Data Platform to facilitate the adoption of data and AI governance. These samples include predefined metadata configurations, templates, taxonomies, and asset examples that serve as a starting point for implementation projects.
The samples are not part of the standard product and are not covered by support. They are offered as free accelerators provided by Anjana Data S.L. to serve as a starting point in implementations, proof of concepts (POCs), training sessions, and demo environments.
A common case is loading the sample associated with the HEALTH DCAT-AP metadata standard, available as a functional accelerator.
Sample loading steps
-
Go to the environment's Ansible inventory variables directory:
cd /opt/ansible/ansible-inventories/<inventario>/group_vars -
Open the global configuration file:
vim all.yaml -
Configure the name of the sample to load.
In this example, for the HEALTH DCAT-AP accelerator, enter:sample: "pub-health-dcatap"Save the changes and close the editor.
The list of available samples can be found in the Anjana Data artifact repository, using the access key provided during implementation.
-
Run the task to clean up the previous content of the environment's persistences:
anjana -t delete -
Run the insertion of the configured sample:
anjana -t insert -
Unlock the schemas to avoid migration locks when starting the microservices.
This step prevents errors such as "Waiting for changelog lock":anjana -t unlock-schemas -
Wait for the microservices to finish starting up and, once they are operational, access the platform to verify that the sample has loaded correctly.