
Full Kit Functionality
This Annex covers all the information about the possible configurations and utilities not covered in the main tab of the document.
All.yaml Explained
The kit includes a file, all.yaml, which contains many variables, some of them not included in the default file, and editable options to facilitate the technical management of the environment.
Along with the kit, an all-example.yaml file has been provided with all the possible configuration variables as a reference.
The available functions are detailed below:
Versioning
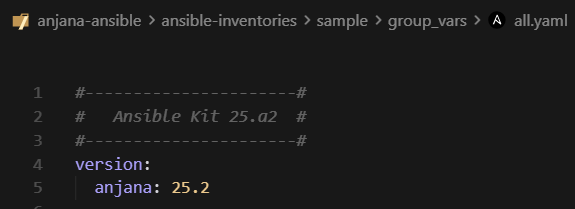
Since kit 25.a1, an automatic selection of the latest available artifact is included via product-based versioning.
-
version.anjana: allows product-based version selection. In this case, by selecting 25.2, the most recent available 25.2 packages will be automatically downloaded when an update is performed.
-
version.rc: allows downloading release candidate versions (prerelease) before their official publication.
They may not be stable, use responsibly.
-
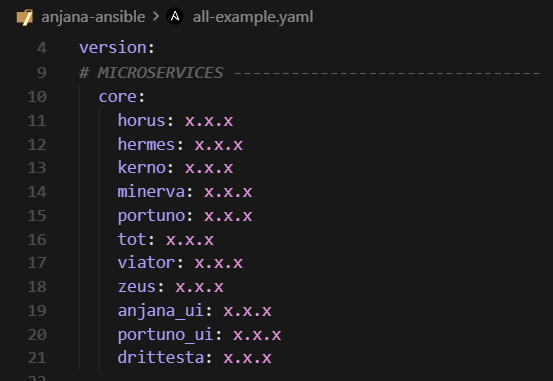
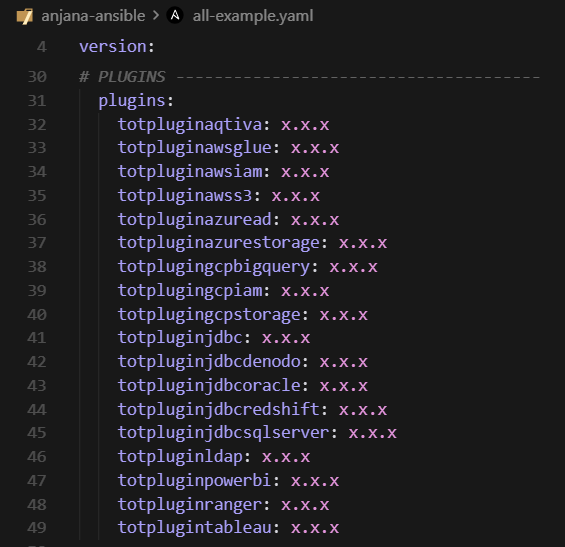
version.core / version.plugins: these two keys allow defining versions individually for core microservices and plugins.
Individually specified versions take precedence over the indicated product version. A microservice or plugin with a fixed version will not be automatically updated beyond the fixed version.
-
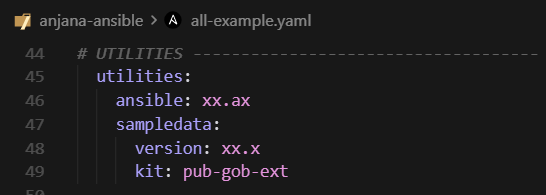
version.utilities.ansible: defines the kit version that will be downloaded when running the ansible tag. Necessary for the kit update process.
-
version.utilities.sampledata: covers the two keys to define the version and type of the sample data kit that will be downloaded when indicated, both in the deployment with sample data and in the reset and data insertion operation.
Connection Strings
Default configuration has been included to facilitate its use and reduce the number of modifications needed for the environment to work.
Since 25.a2, every time the connection strings are modified in all.yaml, it will be necessary to re-platform to generate the updated environment variables file using the command anjana -t platform.
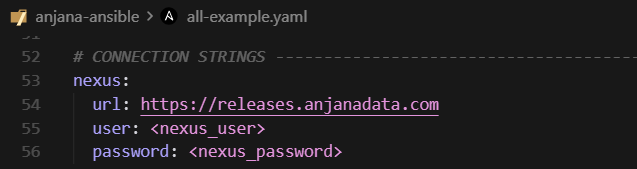
-
nexus.url: domain of the Anjana server that provides the artifacts during installation and other operations. Configured as a default value, it is not necessary to add this property if you do not want to modify its value.
-
nexus.user and nexus.pass: connection credentials to nexus. Must be requested at cs@anjanadata.com.
-
nexus.external: repositories provided by Anjana for downloading artifacts, defined by default.
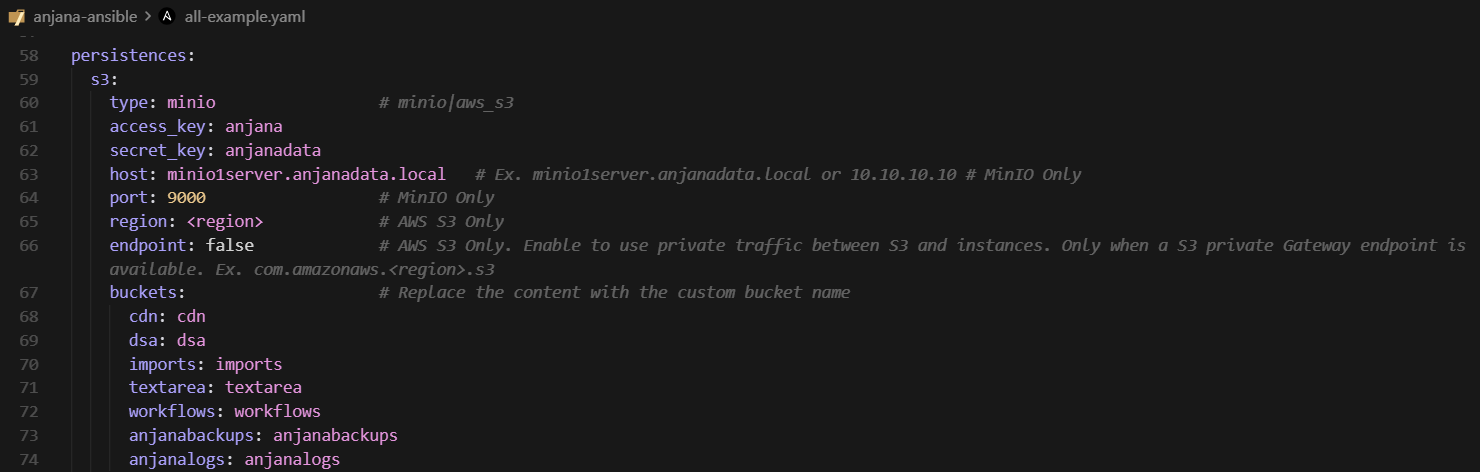
-
persistences.s3 allows editing the credentials and customizations needed to deploy MinIO or to connect to the chosen S3 technology.
-
persistences.s3.type: allows switching between MinIO and AWS S3 as the bucket storage service.
-
persistences.s3.access_key and persistences.s3.secret_key: access credentials to the technology. Default values provided, they can be changed.
-
persistences.s3.host: connection url to the S3 technology. ONLY MinIO.
-
persistences.s3.port: port specified for the connection to the S3 technology. ONLY MinIO.
-
persistences.s3.region: cloud region where the buckets are located. ONLY AWS S3.
-
persistences.s3.endpoint: allows traffic between Anjana and the buckets to be restricted to the VPC without internet egress, using a private gateway-type endpoint. ONLY AWS S3.
-
persistences.s3.buckets: Anjana operations buckets. Default values, the properties are not included in the provided file.
It is recommended to leave the default values in buckets.
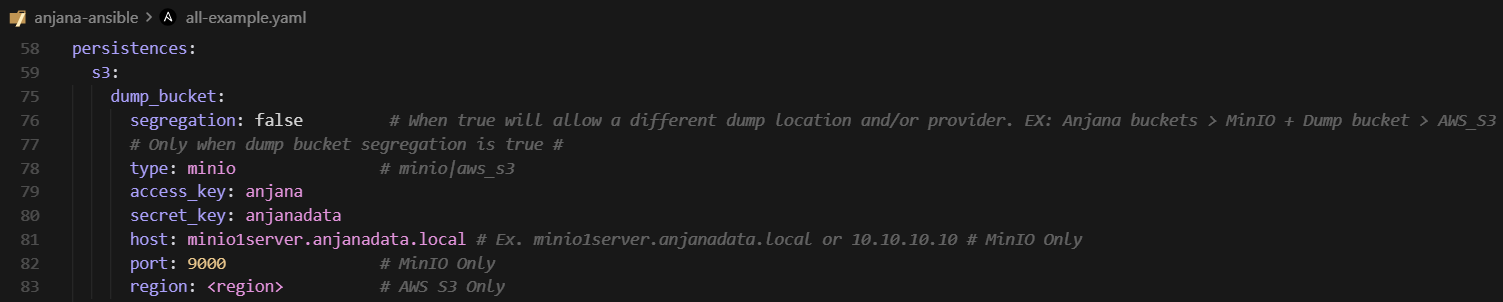
-
persistences.s3.dump_bucket: allows, via segregation true/false, enabling or disabling the segregation of the dump bucket as a means of data dumping. This allows Anjana's buckets to be located in MinIO while anjanabackups is in AWS S3, or vice versa.
The rest of the properties will be filled in as mentioned above.
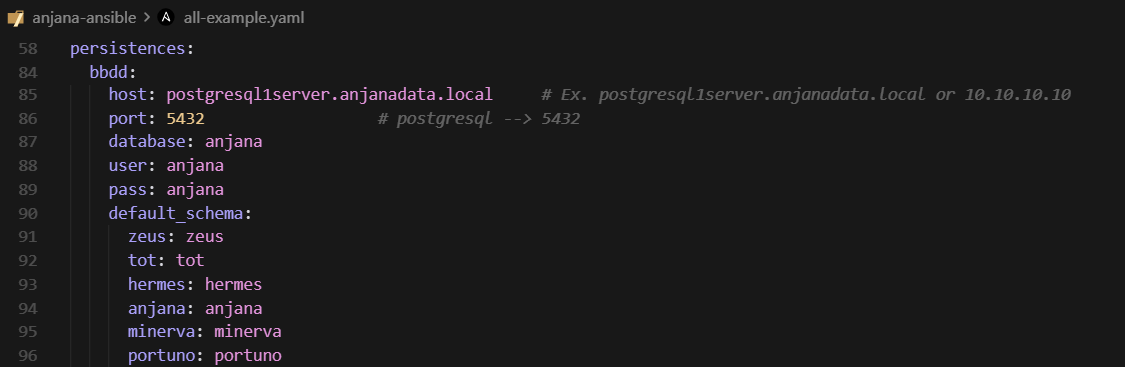
-
persistences.bbdd allows editing the credentials and customizations needed to deploy PostgreSQL or to connect with RDS.
-
persistences.bbdd.host: connection url to the database.
-
persistences.bbdd.port: port specified for the connection to the database.
-
persistences.bbdd.database: name of the database for the connection.
-
persistences.bbdd.user and persistences.bbdd.pass: access credentials to the database. Default values provided, they can be changed.
-
persistences.bbdd.default_schema: Anjana database schemas. Default values, the properties are not included in the provided file.
It is recommended to leave the default values in schema.
-
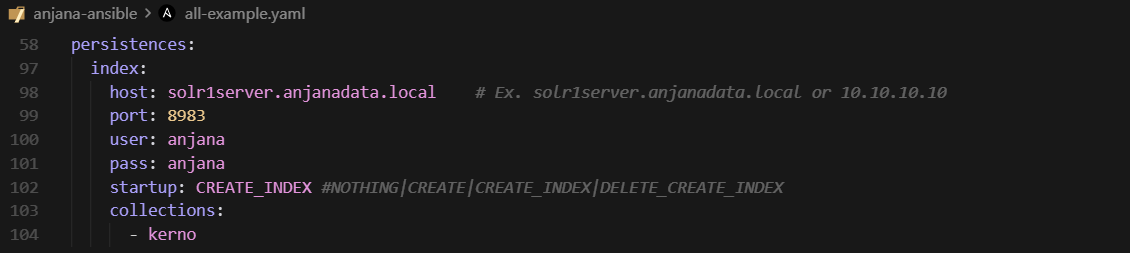
persistences.index allows editing the connection parameters and some settings for the indexing engine. This section is not currently included in the provided all.yaml file, all values have been set by default.
-
persistences.index.host: connection url to the indexer.
-
persistences.index.port: port specified for the connection with the indexer.
-
persistences.index.user and persistences.index.pass: access credentials to the indexer. Default values provided, they can be changed.
-
persistences.index.startup: allows altering the behavior of the indexing engine during Minerva startup.
Changing the default value can cause undesired results and data loss.
-
persistences.index.collections: Anjana default collections.
It is recommended to leave the default collection values provided in collections.
Installation Configuration
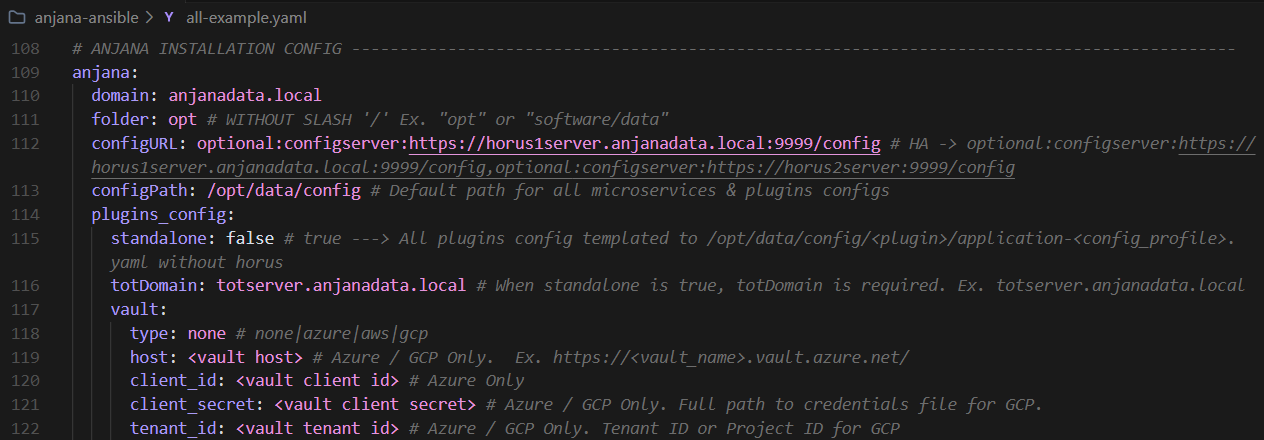
This section allows configuring and customizing the Anjana deployment. By default, the recommended parameters are already set.
-
anjana.domain: allows setting the access domain for the Anjana instance.
This parameter is required for Anjana to work correctly in a PRE/PROduction environment. The wildcard certificate associated with that domain must be available in /opt/common/anjana-certs/ for the instance to work when a public certificate is used.
-
anjana.folder: root folder for the deployment of all of Anjana. Set by default to /opt.
-
anjana.configURL: path to the configuration microservice, already set by default.
Not recommended to set this property unless necessary.
-
anjana.configPath: directory where the configuration will be stored, already set by default.
-
anjana.plugins_config.standalone: when it is true, it allows the plugins to work in standalone mode, they will not need horus to work. The configuration file will be deployed on the same node as the plugin.
-
anjana.plugins_config.totDomain: when standalone mode is true this value is required. It allows defining the domain of the machine where tot is located for the correct communication of the plugins.
-
anjana.plugins_config.vault.type: corresponds to the type of vault used to host the plugin configuration properties, with none corresponding to false.
For the configuration via vault to work, it is required that the plugin config be standalone.
-
anjana.plugins_config.vault.host: allows configuring the host or access url to the vault. ONLY Azure or GCP.
-
anjana.plugins_config.vault.client_id: allows configuring the client_id for access to the vault. ONLY Azure or GCP.
-
anjana.plugins_config.vault.secret_id: allows configuring the secret_id for access to the vault. ONLY Azure or GCP. For GCP it will be the path to the required .json credentials file.
-
anjana.plugins_config.vault.tenant_id: id of the project or tenant to which you want to connect. ONLY Azure or GCP.
-
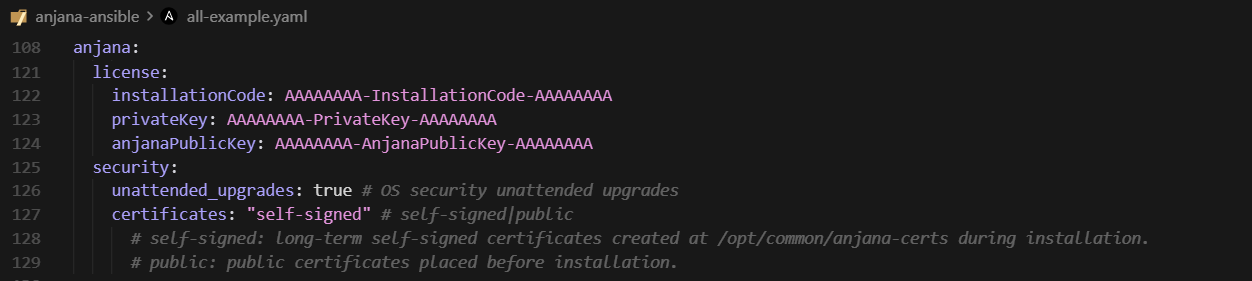
anjana.license: allows specifying the Anjana license to enable the use of the product. Must be requested at cs@anjanadata.com.
-
anjana.security.unattended_upgrades: allows enabling the automatic security updates provided by the operating system.
It is recommended to leave this option enabled.
-
anjana.security.certificates: allows choosing the type of certificate to use within Anjana, between a long-lived self-signed one provided by the installer or a public one provisioned prior to the installation of the Anjana environment.
It is recommended to leave the default value.
To avoid compatibility issues between external technologies and Anjana's self-signed certificate, it is recommended to set up a load balancer or proxy in front of the Anjana core instance or instances.

-
installation.mode: allows choosing the deployment mode for the Anjana instance. It is explained below:
-
installation.mode: manager allows deploying Anjana using a controller node. The manager node will download all the artifacts and then forward them to the corresponding nodes. This mode allows only the manager node to have access to the repositories.
-
installation.mode: direct allows downloads and deployments to be performed directly on the destination nodes (front, back, persistence layers, etc.). In this mode all the nodes in the environment will require a connection to the repositories.
-
installation.mode: local allows the Anjana deployment to take place without needing a connection to the repository.
-
Manager designed for distributed or load-balanced environments. Leave this default value if no additional customization is needed.
Direct optimal for single-node environments.
Keep the following in mind:
-
The deployment will be performed from the ansible node (manager).
-
Basic connectivity to the operating system's package repository is necessary.
-
It will be necessary to have previously downloaded all the artifacts required for the Anjana deployment using the download tag, and for them to be located in the Anjana temporary directory /tmp/anjana on the manager node.
-
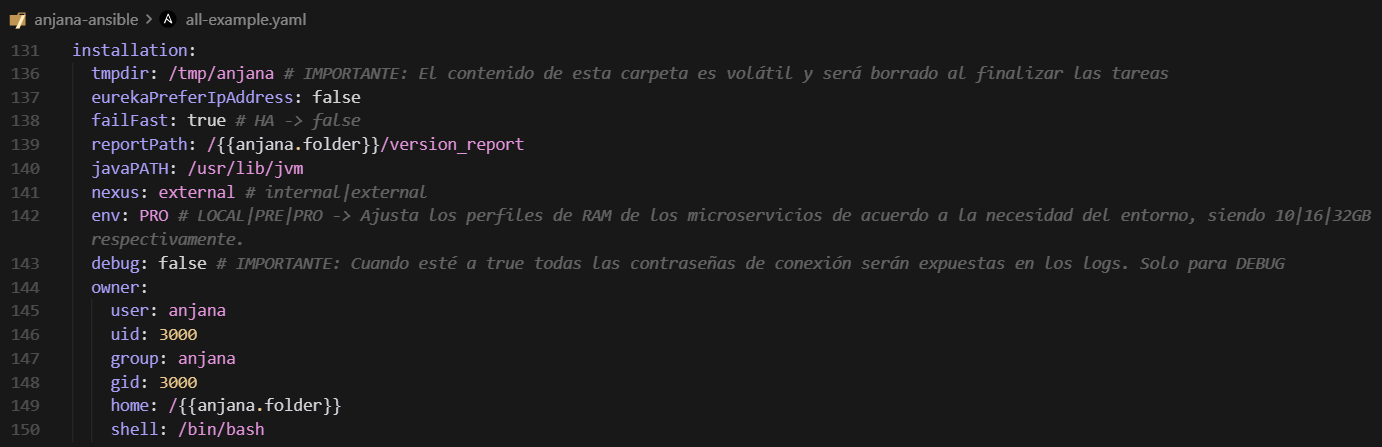
installation.tmpdir: allows defining the Anjana artifacts temporary directory.
All the content of this folder will be deleted during the system restart or at the end of each kit run.
-
installation.eurekaPreferIpAddress: allows altering the registration preference of the applications in SpringBoot.
It is recommended to leave the default value.
-
installation.failFast: allows the applications to fail in case they cannot reach the configuration microservice.
It is recommended to leave the default value. In the case of a load-balanced environment, it will be necessary to set it to false.
-
installation.reportPath: allows defining the directory and log file for the ansible kit run records.
-
installation.javaPATH: allows defining the default directory where the JAVA installation is located.
It will be necessary to edit the default value if JAVA has been installed in a custom location.
-
installation.nexus: allows defining the Anjana installation mode.
It is recommended to leave the default value.
-
installation.env: allows defining the type of environment to adjust the RAM profiles according to the deployed instance.
It is recommended to leave the default value.
-
installation.debug: when set to true, allows obtaining additional trace information from the kit run logs as well as access to the debug ports.
When this value is true, all debug ports are exposed after the deployment of the service descriptors. Likewise, all passwords and connection strings will be exposed and logged in the kit run logs. Only recommended for maintenance or debug tasks.
-
installation.owner: allows configuring the details of the user who will be granted ownership of the Anjana installation.
It is recommended to leave the default value.
Cross-node Connection User
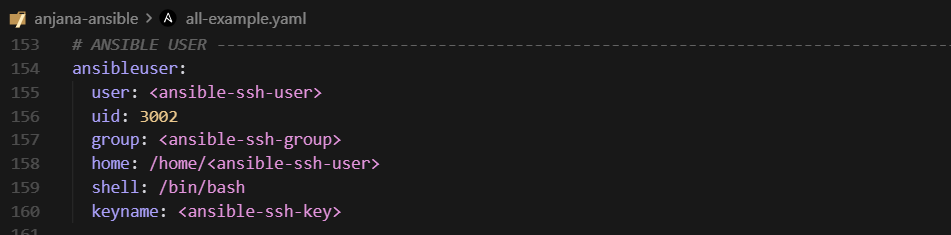
All the properties defined under ansibleuser allow the configuration of an access user for all the nodes, for correct communication between instances in a distributed or load-balanced environment.
The ansible-user tag is used to deploy it.
To deploy this user, it is first necessary to indicate in hosts.yaml a user with sufficient administrator permissions to edit files and directories as root.
Import of Roles and Configuration
This section allows editing which roles and configuration will be imported during the Anjana deployment or the kit runs.
-
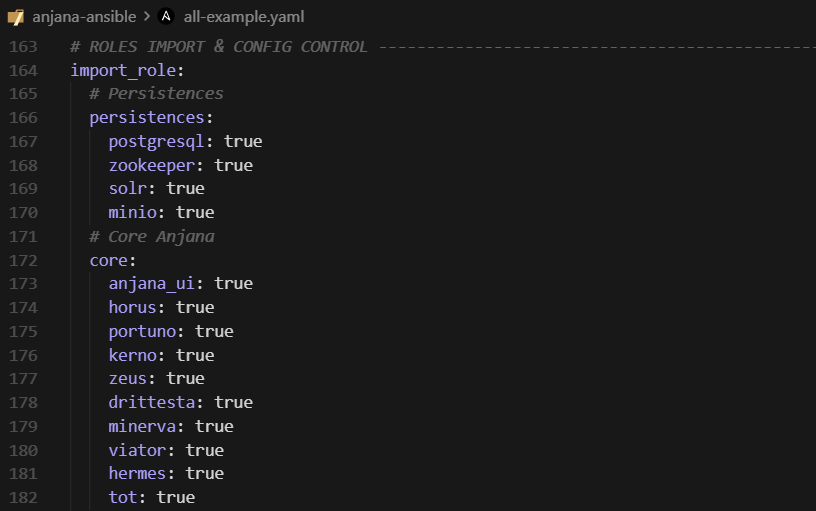
import_role.persistences: allows configuring which persistence layers will be imported during the ansible run.
It will be necessary to adjust this section according to the persistence layers being used. Usage example: for an environment using AWS S3, MinIO should be set to false.
-
import_role.core: allows configuring which core roles and their configuration will be imported.
It is recommended to leave the default value.
-
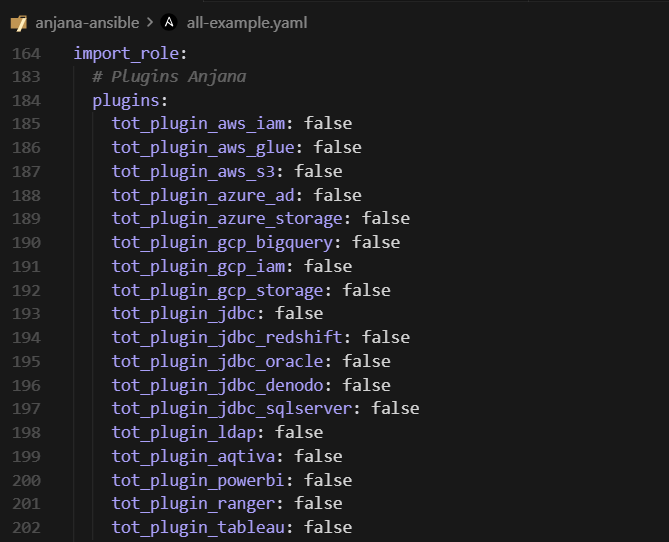
import_role.plugins: allows configuring which plugin roles and their configuration will be imported. It will be adjusted as needed.

-
import_role.extras: allows defining which third-party software to import during deployment and execution. It will be adjusted as needed.
Log Export and Monitoring

-
log.since: allows defining which log range will be exported during the execution of the export-log tag and its subsequent upload to the anjanalogs bucket with the export-log-s3 tag.
-
monitoring.otlp.enabled: allows enabling Java instrumentation for the microservices and plugins.
-
monitoring.otlp.endpoint: url of the collector for sending metrics, logs, and traces.
-
monitoring.otlp.port: collector port.
The monitoring section enables the instrumentation of the Java microservices and plugins, as well as compatibility with the Open Telemetry Collector.
The Open Telemetry Collector is not included in the installation.
If monitoring is enabled or disabled once the product has been installed, it will be necessary to re-platform the environment using the command anjana -t platform.
Governance Metrics Platform
-
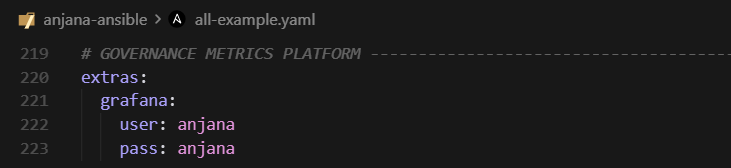
extras.grafana.user and extras.grafana.pass: allow setting the access user for the Grafana interface hosted at /grafana. By default, this utility is not enabled for import, but it can be enabled and subsequently deployed with the grafana tag.
If grafana is enabled once the product has been deployed and not during its installation, it will be necessary to run the update-vhosts tag to enable the route on the web server.
Instance Platforming
Ansible anjana Command
For easier handling of the kit and all its functionality, a command is configured by default that transforms the whole ansible command into a simple anjana command followed by any additional parameters that need to be added.
To reset or configure the command manually, it will be necessary to run these commands:
touch /usr/local/bin/anjana
echo '#!/bin/sh
sudo ansible-playbook -i /opt/ansible/ansible-inventories/<inventario>/hosts.yaml /opt/ansible/anjana.yaml "$@"' | sudo tee /usr/local/bin/anjana > /dev/null
sudo chmod 755 /usr/local/bin/anjana
Keep in mind that the path to the ansible kit or the inventory itself will vary depending on the environment, so it will be necessary to adjust it as needed.
Additional Platforming
During the deployment of an Anjana environment, the instance on which ansible is running is platformed, in order to prepare all the requirements and install all the necessary dependencies.
How to platform the additional instances for a distributed environment is covered in the Environment Platforming section of the Anjana Deployment.
To recondition or platform new instances added after the Anjana deployment, for example due to a possible migration of the frontend or persistence server, it would be necessary to adjust the hosts.yaml file of the inventory in use to reflect the latest infrastructure changes.
After that, it would be possible to run the platforming tag as seen previously:
anjana -t platform
Managing Aliases in /etc/hosts
Since 23.1, the Anjana aliases in the /etc/hosts file are managed by the ansible kit completely autonomously, as can be seen in the screenshot below:
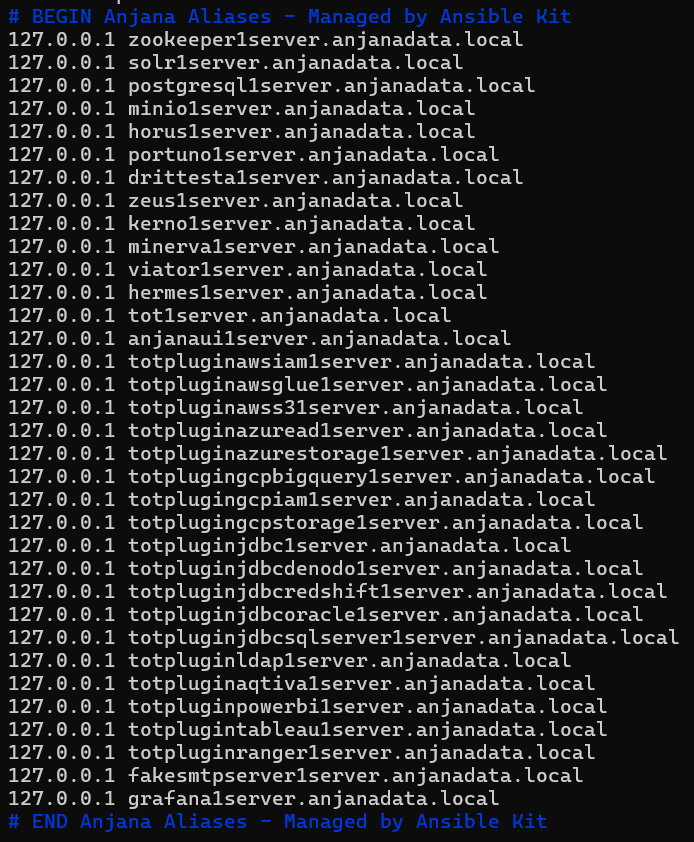
The domain anjanadata.local is only an example, being replaced by the domain covered in the certificate provided for the Anjana deployment.
If any instance has been added, as happened in the previous section, or if the infrastructure for the Anjana environment has been modified after the product deployment, it will be necessary to indicate the new IPs of the machines in the hosts.yaml file of the inventory being used.
Once the file has been updated to reflect the latest changes, the aliases of all the machines can be automatically updated using the tag:
anjana -t aliases
The outdated state of these aliases or their manual modification can lead to a malfunction of the product and the kit.
If it is necessary to add manual entries, this must be done outside of the block managed by ansible so that they are not replaced.
Custom Connection User
It is possible to create a user as described in the Cross-node Connection User section, which will allow communication between nodes (instances) of an Anjana environment, specifically the manager node with the rest of the environment.
To be able to create this user in a kit-assisted way, it is necessary to modify the all.yaml section, and indicate the name that the user will take, as well as its group and key.
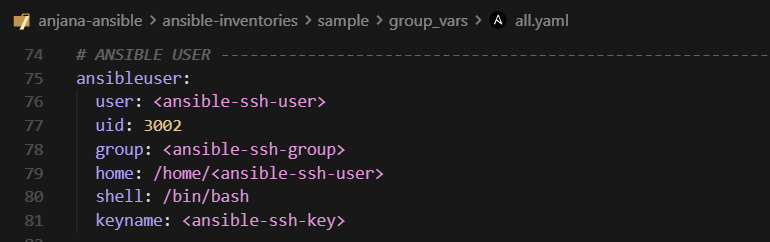
Once filled in, it will be necessary to verify that the hosts.yaml file of the inventory has an administrator user with sufficient permissions to edit files and folders of other users. An example of this is root, but another user is recommended.
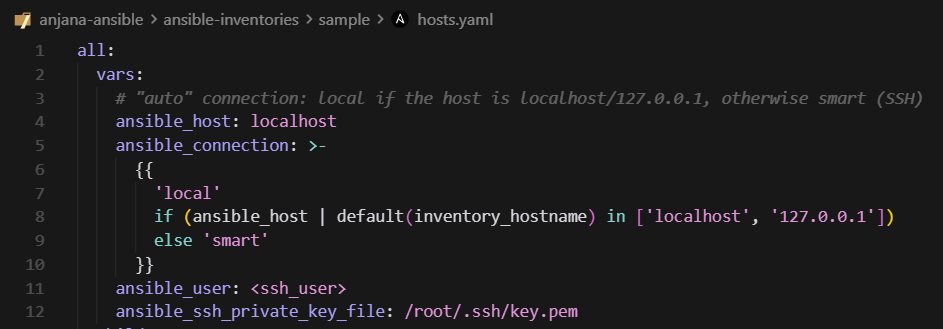
Once confirmed, the new user is deployed using the tag:
anjana -t ansible-user
Once the operation is complete, the key of the generated user will be available in the directory /home/<ansible-user>/.ssh/<key>.pem.
It will be necessary to replace the user in hosts.yaml with the newly generated one.
Cloud Integrations
The kit offers compatibility and functionality with certain cloud providers, which are detailed below.
Buckets in AWS S3
In order to use buckets hosted in AWS S3 with the kit, it is necessary to adjust the all.yaml file to point to the buckets available in an AWS region. Some properties will not be available by default and will need to be added:
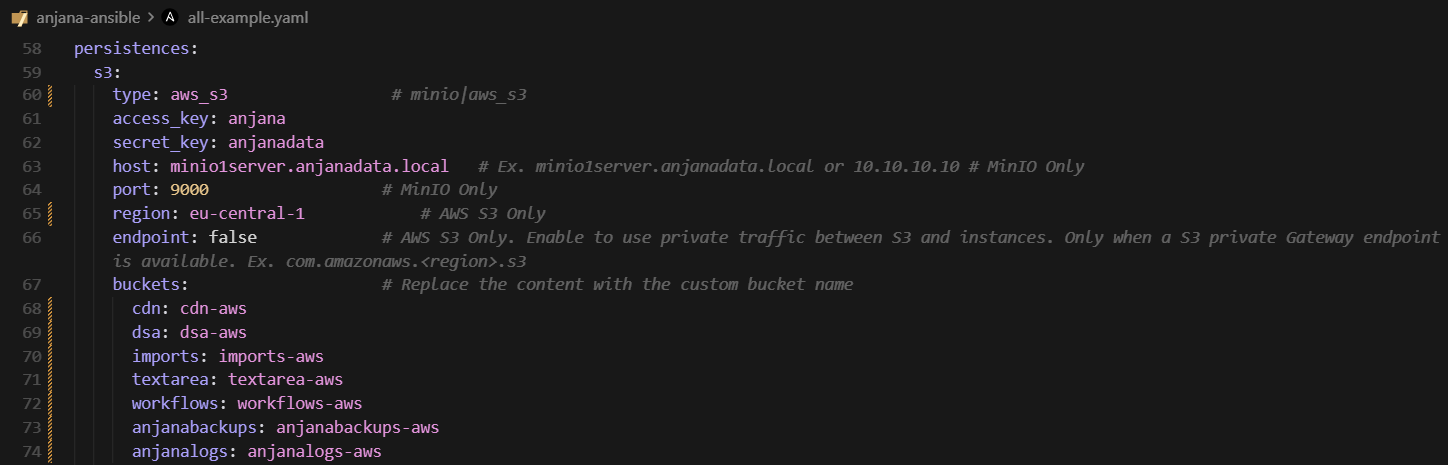
It will also be necessary to disable MinIO, to avoid deploying it unnecessarily:
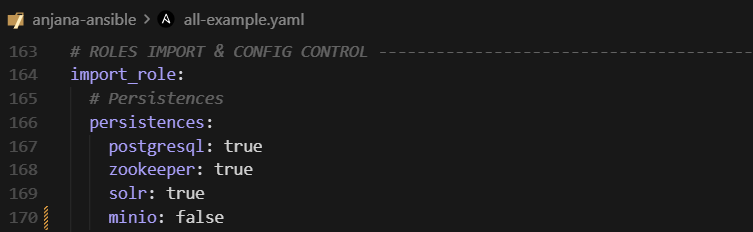
Once both are adjusted, you can proceed to deploy Anjana normally.
PostgreSQL in RDS
Unlike AWS S3, the kit directly supports RDS given the nature of the connection string, only requiring modification of the host, and the connection port if necessary, along with the credentials, as shown:
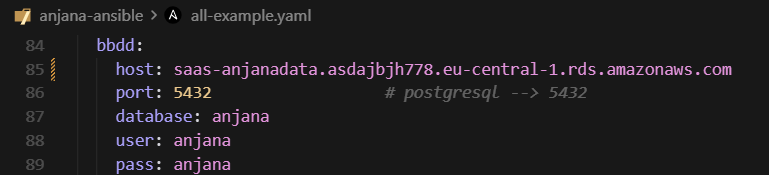
As with AWS S3, it will be necessary to disable the PostgreSQL role to avoid its unintended deployment:
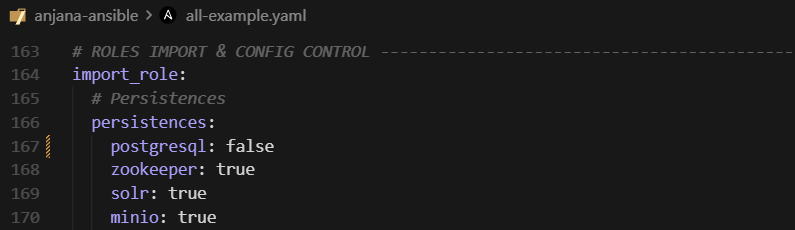
Once both are adjusted, you can proceed to deploy Anjana normally.
Data Management
Artifact Download
Using the download tag, it is possible to download all the artifacts required to run the deployment in an environment without a connection to the Anjana repository.
The artifact download only works with installation.mode: manager. The artifacts will be deposited in /tmp/anjana on the manager node (the node that runs ansible).

Data Operations
The kit provides a series of utilities for safely handling the environment's data.
Keep the following in mind:
-
All data operations except delete stop and then start the environment to avoid corruption.
-
All operations except export/import perform an automatic backup of the existing data beforehand.
-
No data insertion or import operation replaces existing data. All data must be deleted beforehand for the operation to work.
-
The delete data operations stop the environment but do not start it again afterwards.
All data operations are performed on the /opt/export-import directory.
The available operations are as follows:
-
Data export/import, using the tags already mentioned in the Data Migration section.
-
Data deletion: allows deleting all the data from the environment's persistence layers, both individually and overall (not the configuration), using the following tags:
anjana -t delete
anjana -t delete-s3
anjana -t delete-bbdd
anjana -t delete-solr
-
Data insertion: allows the insertion, both overall and individually, of the data kit selected in the all.yaml file in this section:
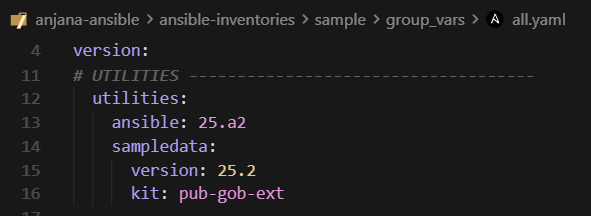
The following tags are available:
anjana -t insert
anjana -t insert-s3
anjana -t insert-bbdd
-
Data reset/restore: allows deletion and subsequent insertion of the selected data kit in the same way as the two previous points. The available tags are as follows:
anjana -t reset
anjana -t reset-s3
anjana -t reset-bbdd
Dump Management and Scheduling
The kit allows managing backups in an external bucket and their subsequent restoration, as well as setting the backup schedule.
To this end, the following functionalities have been defined:
-
Segregation in the all.yaml file of the anjanabackups bucket, the current bucket used for backups of Anjana's persistence layers and configuration.
Segregation has the same configurations as the regular S3 section, making it possible to assign different credentials for this purpose, as well as to locate the anjanabackups bucket on a different technology.
Usage example: Anjana buckets located on a local MinIO server, anjanabackups bucket located on AWS S3.
It is recommended to enable segregation to ensure that the backups are located in a different location from a possible point of failure.
-
Data + configuration backups: using the anjanabackups bucket as the destination. This process will back up all the persistence layer data as well as the microservices' configuration, and it will be compressed and uploaded to the anjanabackups bucket with a timestamp.
It is possible to enable and define a retention period for this operation in the persistencesutilityhosts.yaml file of the inventory in use:To run the backup in this way, the following tag is used:
anjana -t backup-dump
-
Data restore: using the anjanabackups bucket as the data source.
During the backup, all the persistence layers + configuration are backed up, but for the restoration it is possible to define, from the persistencesutilityhosts.yaml file of the inventory in use, which persistence layers + configuration will be restored, as can be seen below:

This process will analyze the backups available in the anjanabackups bucket and provide a list of the latest available ones to select which one to restore from. If no backup exists, a message will be shown and the process will stop.
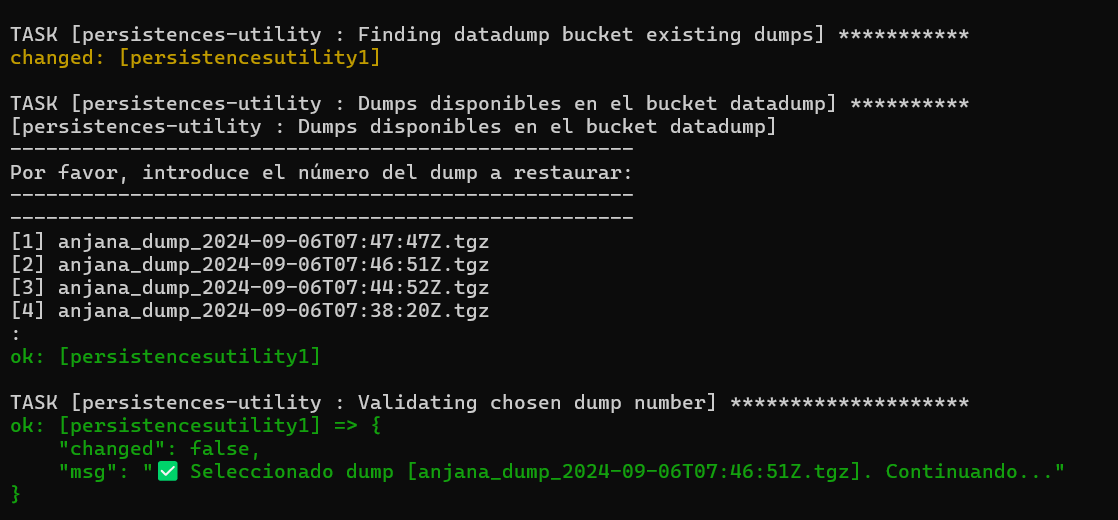
To perform the restoration, the following tag is run:
anjana -t restore-dump
Cron for backup: it is possible to deploy a cron job for the backup-dump tasks, defining its frequency via configurable properties in the persistencesutilityhosts.yaml file of the inventory in use:

To deploy the cron job or update it, the following tag is run:
anjana -t dump-cron
If it is disabled, the cron job will be deleted the next time the tag is run.
Security Management in Anjana
Certificate Management and Renewal
Since 25.a2, the required certificate is automatically generated by the installation, self-signed and long-lived.
Each time the environment version is updated and requires re-platforming, the self-signed certificate is regenerated and therefore updated.
If you want to use a public certificate, it needs to be deposited in the /opt/common/anjana-certs/ directory of all the instances that make up the Anjana environment.
The certificate WILL NOT be provided by Anjana in the IaaS/PaaS mode, since it requires creating the wildcard certificate covering the domain and subdomains for accessing the environment, and it will be managed by the infrastructure maintainer.
For a new deployment, if the certificate is public, it must already be present in the aforementioned directory before the deployment starts, in order for the product and the kit to work correctly. Explained in the Anjana Deployment section.
In case of renewal, for the new certificate to be correctly propagated among all the microservices and persistence layers, it will be necessary to place them again in the aforementioned directory, and run the following tag:
anjana -t certificates-deploy
To ensure the application works correctly after the certificate update, it will be necessary to restart with:
anjana -t restart
Security Updates
Allows enabling or disabling automatic updates of security packages and backports on all the nodes in the environment. This setting can be adjusted in all.yaml in this section:

They are enabled by default but can be modified. They apply to all the systems supported by the kit. If any modification is made, it will be necessary to run the following tag to apply the changes:
anjana -t platform
Security in Apache2
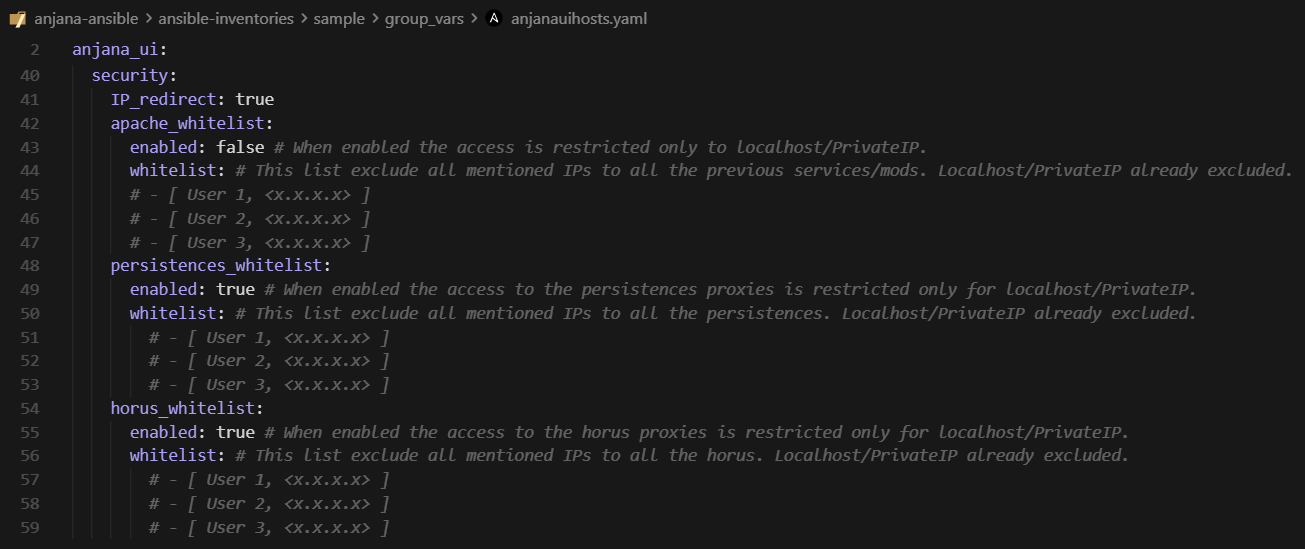
It is possible to manage the Apache2 security configuration and the Anjana frontends. To do so, the following settings are available in the anjanauihosts.yaml file of the inventory in use:
-
anjana_ui.security.IP_redirect: allows redirecting all frontend access via IP to the configured domain.
-
anjana_ui.security.apache_whitelist: allows enabling and defining, via the whitelist property, a list made up of User and IP, which will be used as an exception in all the security measures discussed above.
-
anjana_ui.security.persistences_whitelist: allows enabling via the enabled property and defining via the whitelist property, a list made up of User and IP as in the previous point, which will be used as an exception in the persistence layer proxies (/minio, /solr).
-
anjana_ui.security.horus_whitelist: allows enabling via the enabled property and defining via the whitelist property, a list made up of User and IP as in the previous point, which will be used as an exception for access to the SpringBoot administration panel.
All the security measures, except for the apache2 whitelist for Anjana frontends (not persistence layers), come enabled by default to improve the baseline security of the environment.
Utilities
Connection Checkers
The kit includes two connection checkers, which are detailed below:
Connection to artifact repositories: it is possible to verify the connection to the Anjana artifact server using the following tag:
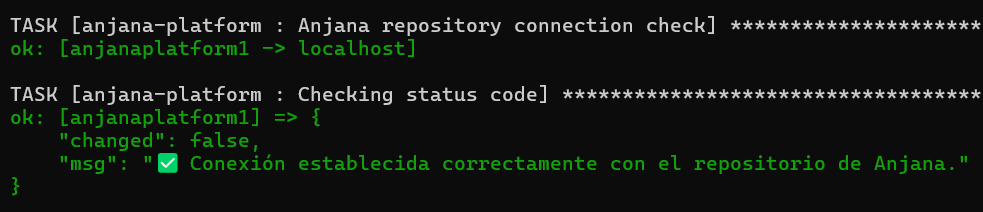
anjana -t check-repository
Connection to the persistence layers: the following tag provides a check of the connection to the chosen persistence layers, whether Cloud-based or hosted within the environment itself:

anjana -t check-connection
It is recommended to use both tags for troubleshooting or to test the connection after credential changes, among other scenarios.
Swap
A tag has been added to the kit that allows adding a swap file to extend the available memory by 4GB, it not being possible to modify that size via the kit at this time.
To deploy the swap file, it will be necessary to run the following tag:
anjana -t swap
In order to guarantee the availability of the environment, a swap has been incorporated by default to protect the platform from unexpected memory spikes caused by factors unrelated to the Anjana environment itself.
Anjana Log Rotation
In addition to what was discussed in the previous section, it is possible to set up a log rotation to avoid filling up disk space. This rotation sets a maximum of 2 log files in total, with each file having a maximum content of 2GB.
This rotation is applied by default starting from kit 25.a1, and it is not possible to disable it via the kit itself.
To configure the rotation on machines that do not have it, it will be necessary to run the tag:
anjana -t log-rotate
Load Balancer for MinIO
A load balancer for environments with multiple MinIO nodes has been provided in the anjanauihosts.yaml file of the inventory in use. It comes enabled by default; to use it, the following is necessary:
-
anjana_ui.port.minioProxyPass: to edit the port if necessary.
This must be taken into account for the configuration of the microservices that use the MinIO service.
-
anjana_ui.balancer.minio_nodes: to indicate the MinIO nodes to be load-balanced. The first one is already included by default and does not need to be modified, since it is provided by the configuration in all.yaml. The rest must be adjusted as needed.
Extras
Governance Metrics
Additionally, the Grafana software has been included in the kit, which allows deploying dashboards for visualizing the metrics related to data governance in Anjana.
The software comes with a sample dashboard.
To deploy Grafana, it will be necessary to enable it in all.yaml, in the import_role section:
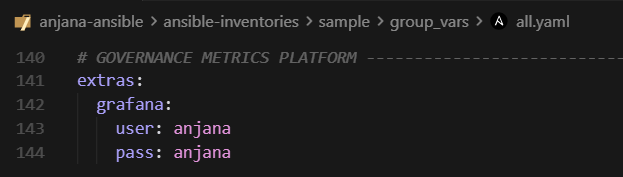
And then, run the tag:
anjana -t grafana
If you want to modify the default dashboard or add more, it will be necessary to access the inventory templates and create the new dashboards at the path /opt/ansible/ansible-inventories/<inventory>/templates/grafana/dashboards/.
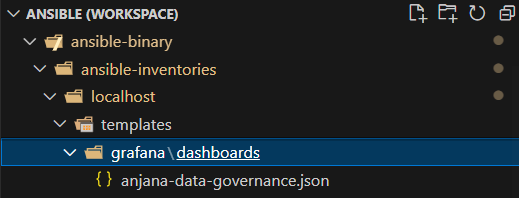
The path may differ and will depend on the location of the inventory.
To update the dashboards once they have been placed in the correct path, the following tag is run:
anjana -t update-dashboards